Archive for November, 2011

Survival Tip of the Day brought to you by Kershaw.

3 Reasons Why Your Shelter Is Crucial to Survival

A shelter can protect you from the sun, insects, wind, rain, snow, hot or cold temperatures and enemy observation. It can give you a feeling of well-being. It can help you maintain your will to survive.

In some areas, your need for shelter may take precedence over your need for food and possibly even your need for water. For example, prolonged exposure to cold can cause excessive fatigue and weakness (exhaustion). An exhausted person may develop a “passive” outlook, thereby losing the will to survive.

Size Matters

The most common error in making a shelter is to make it too large. A shelter must be large enough to protect you. It must also be small enough to contain your body heat, especially in cold climates.

Shelter Site Selection Tips

When you are in a survival situation and realize that shelter is a high priority, start looking for shelter as soon as possible. As you do so, remember what you will need at the site. It must contain material to make the type of shelter you need, and it must be large enough and level enough for you to lie down comfortably.

When you consider these requisites, however, you cannot ignore your tactical situation or your safety. You must also consider whether the site provides concealment from enemy observation. Are there camouflaged escape routes? Does your shelter have any method for signaling? You must be sure that any shelter is able to protect against wild animals and rocks and dead trees that might fall. It is also important that your structure is free from insects, reptiles and poisonous plants.

You must also remember the problems that could arise in your environment. There could be a heavy rain overnight, causing flooding in low-lying areas, so avoid possible flood zones in foothills. Avoid avalanche or rockslide areas in mountainous terrain, and be careful when camping along bodies of water. The water level could rise drastically with the tide, or from heavy rains upstream.

In some areas, the season of the year has a strong bearing on the site you select. Ideal sites for a shelter differ in winter and summer. During cold winter months you will want a site that will protect you from the cold and wind, but will have a source of fuel and water. During summer months in the same area you will want a source of water, but you will want the site to be almost insect free. When considering shelter site selection, use the word “BLISS” as a guide.

B – Blend in with the surroundings.

L – Low silhouette.

I – Irregular shape.

S – Small.

S – Secluded location.

Information courtesy of the U.S. Army Survival Manual

Thanks again to Kershaw for their support. Remember to like Kershaw and Zero Tolerance Knives on Facebook.

– Tim

Survival Tip of the Day brought to you by Kershaw.

L – Live by Your Wits, But for Now, Learn Basic Skills

Kershaw fire starter - a basic tool to save your life

Without training in basic skills for surviving and evading on the battlefield, your chances of living through a combat, survival and/or evasion situation are slight.

Learn these basic skills now — not when you are headed for or are in the battle, or en route for an excursion to a remote or harsh environment. How you decide to equip yourself before deployment will impact on whether or not you survive. You need to know about the environment to which you are going and you must practice basic skills geared to that environment. For instance, if you are going to a desert, you need to know how to get water in the desert.

Practice basic survival skills during all training programs and exercises. Survival training reduces fear of the unknown and gives you self-confidence. It teaches you to live by your wits.

Information courtesy of the U.S. Army Survival Manual

Thanks again to Kershaw. Use your wits and remember to like Kershaw and Zero Tolerance Knives on Facebook.

– Tim

Survival Tip of the Day brought to you by Kershaw.

A – Act Like the Natives

The natives and animals of a region have adapted to their environment. To get a feel of the area, watch how the people go about their daily routine. When and what do they eat? When, where and how do they get their food? When and where do they go for water? What time do they usually go to bed and get up? These actions are particularly important to you when you are trying to avoid capture.

Act Like the Natives, Follow the Animals

Animal life in the area can also give you clues on how to survive. Animals also require food, water and shelter. By watching them, you can find sources of water and food.

Animals cannot serve as an absolute guide to what you can eat and drink. Many animals eat plants that are toxic to humans.

Keep in mind that the reaction of animals can reveal your presence to the enemy. If in a friendly area, one way you can gain rapport with the natives is to show interest in their tools and how they get food and water. By studying the people, you learn to respect them; you often make valuable friends; and, most importantly, you learn how to adapt to their environment and increase your chances of survival.

Information courtesy of the U.S. Army Survival Manual

Thanks again to Kershaw. Remember to like Kershaw and Zero Tolerance Knives on Facebook. Everyone else is doing it.

– Tim

Survival Tip of the Day brought to you by Kershaw.

V – Value Living

All of us were born kicking and fighting to live but we have become used to the soft life. We have become creatures of comfort. We dislike inconveniences and discomforts. What happens when we are faced with a survival situation with its stresses, inconveniences and discomforts? This is when the will to live — placing a high value on living — is vital. The experience and knowledge you have gained through life and your training will have a bearing on your will to live. Stubbornness, a refusal to give in to problems and obstacles that face you, will give you the mental and physical strength to endure.

Information courtesy of the U.S. Army Survival Manual

Thanks again to Kershaw. Remember you can like Kershaw and Zero Tolerance Knives on Facebook. You’ll be glad you did.

– Tim

Survival Tip of the Day brought to you by Kershaw.

I – Improvise

In the United States, we have items available for all our needs. Many of these items are cheap to replace when damaged. Our easy come, easy go, easy-to-replace culture makes it unnecessary for us to improvise. This inexperience in improvisation can be an enemy in a survival situation. Learn to improvise. Take a tool designed for a specific purpose and see how many other uses you can make of it.

Learn to use natural objects around you for different needs. An example is using a rock for a hammer. No matter how complete a survival kit you have with you, it will run out or wear out after a while. Your imagination must take over when your kit wears out.

Information courtesy of the U.S. Army Survival Manual

Thanks again to Kershaw. Go like Kershaw and Zero Tolerance Knives on Facebook.

– Tim

Survival Tip of the Day brought to you by Kershaw.

V – Vanquish Fear and Panic

The greatest enemies in a combat, survival and/or evasion situation are fear and panic. If uncontrolled, they can destroy your ability to make an intelligent decision. They may cause you to react to your feelings and imagination rather than to your situation. They can drain your energy and thereby cause other negative emotions. Previous survival and evasion training and self-confidence will enable you to vanquish fear and panic.

Information courtesy of the U.S. Army Survival Manual

Thanks again to Kershaw. Go like Kershaw and Zero Tolerance Knives on Facebook. Don’t be afraid.

– Tim

Survival Tip of the Day brought to you by Kershaw.

R – Remember Where You Are

Spot your location on your map and relate it to the surrounding terrain. This is a basic principle that you must always follow. If there are other persons with you, make sure they also know their location. Always know who in your group, vehicle or aircraft has a map and compass. If that person is killed, you will have to get the map and compass from him. Pay close attention to where you are and to where you are going. Do not rely on others in the group to keep track of the route. Constantly orient yourself. Always try to determine, as a minimum, how your location relates to —

  • The location of enemy units and controlled areas.
  • The location of friendly units and controlled areas.
  • The location of local water sources (especially important in the desert).
  • Areas that will provide good cover and concealment.

This information will allow you to make intelligent decisions when you are in a survival and/or evasion situation.

Information courtesy of the U.S. Army Survival Manual.

Thanks again to Kershaw. Go like Kershaw and Zero Tolerance Knives on Facebook.

– Tim

Survival Tip of the Day brought to you by Kershaw.

U – Use All Your Senses, Undue Haste Makes Waste

You may make a wrong move when you react quickly without thinking or planning. That move may result in your capture or death. Don’t move just for the sake of taking action.

Consider all aspects of your situation (size up your situation) before you make a decision and a move. If you act in haste, you may forget or lose some of your equipment. In your haste, you may also become disoriented so that you don’t know which way to go. Plan your moves. Be ready to move out quickly without endangering yourself, especially if the enemy is near you. Use all your senses to evaluate the situation. Note sounds and smells. Be sensitive to temperature changes. Be observant.

Information courtesy of the U.S. Army Survival Manual.

Thanks again to Kershaw. Go like Kershaw and Zero Tolerance Knives on Facebook. Do it.

– Tim

Survival Tip of the Day brought to you by Kershaw.

Remember the word SURVIVAL? Over the next several days we will take a closer look at each letter and what it means for your own survival.

S – Size Up the Situation

If you are in a combat situation, find a place where you can conceal yourself from the enemy. Remember, security takes priority. Use your senses of hearing, smell and sight to get a feel for the battlefield. What is the enemy doing? Advancing? Holding in place? Retreating? You will have to consider what is developing on the battlefield when you make your survival plan.

Size Up Your Surroundings

Determine the pattern of the area. Get a feel for what is going on around you. Every environment, whether forest, jungle or desert, has a rhythm or pattern. This rhythm or pattern includes animal and bird noises and movements and insect sounds. It may also include enemy traffic and civilian movements.

Size Up Your Physical Condition

The pressure of the battle you were in or the trauma of being in a survival situation may have caused you to overlook wounds you received. Check your wounds and give yourself first aid. Take care to prevent further bodily harm. For instance, in any climate, drink plenty of water to prevent dehydration. If you are in a cold or wet climate, put on additional clothing to prevent hypothermia.

Size Up Your Equipment

Perhaps in the heat of battle or due to accident, you lost or damaged some of your equipment. Check to see what equipment you have and what condition it is in.

Now that you have sized up your situation, surroundings, physical condition and equipment, you are ready to make your survival plan. In doing so, keep in mind your basic physical needs — water, food and shelter.

Information courtesy of the U.S. Army Survival Manual.

Thanks again to Kershaw. Go like Kershaw and Zero Tolerance Knives on Facebook. Now.

– Tim

Survival Tip of the Day brought to you by Kershaw.

Edibility of Plants

Plants are valuable sources of food because they are widely available, easily procured and, in the proper combinations, can meet all your nutritional needs.

WARNING: The critical factor in using plants for food is to avoid accidental poisoning. Eat only those plants you can positively identify and you know are safe to eat.

Absolutely identify plants before using them as food. Poison hemlock has killed people who mistook it for its relatives, wild carrots and wild parsnips.

At times you may find yourself in a situation for which you could not plan. In this instance you may not have had the chance to learn the plant life of the region in which you must survive. In this case you can use the Universal Edibility Test to determine which plants you can eat and which to avoid.

It is important to be able to recognize both cultivated and wild edible plants in a survival situation. Most of the information in this is directed toward identifying wild plants because information relating to cultivated plants is more readily available. Remember the following when collecting wild plants for food:

• Plants growing near homes and occupied buildings or along roadsides may have been sprayed with pesticides. Wash them thoroughly. In more highly developed countries with many automobiles, avoid roadside plants, if possible, due to contamination from exhaust emissions.

• Plants growing in contaminated water or in water containing Giardia lamblia and other parasites are contaminated themselves. Boil or disinfect them.

• Some plants develop extremely dangerous fungal toxins. To lessen the chance of accidental poisoning, do not eat any fruit that is starting to spoil or showing signs of mildew or fungus.

• Plants of the same species may differ in their toxic or sub toxic compounds content because of genetic or environmental factors. One example of this is the foliage of the common chokecherry. Some chokecherry plants have high concentrations of deadly cyanide compounds while others have low concentrations or none. Horses have died from eating wilted wild cherry leaves. Avoid any weed, leaves or seeds with an almond-like scent, a characteristic of the cyanide compounds.

• Some people are more susceptible to gastric distress (from plants) than others. If you are sensitive in this way, avoid unknown wild plants. If you are extremely sensitive to poison ivy, avoid products from this family, including any parts from sumacs, mangoes and cashews.

• Some edible wild plants, such as acorns and water lily rhizomes, are bitter. These bitter substances, usually tannin compounds, make them unpalatable. Boiling them in several changes of water will usually remove these bitter properties.

• Many valuable wild plants have high concentrations of oxalate compounds, also known as oxalic acid. Oxalates produce a sharp burning sensation in your mouth and throat and damage the kidneys. Baking, roasting or drying usually destroys these oxalate crystals. The corm (bulb) of the jack-in-the-pulpit is known as the “Indian turnip,” but you can eat it only after removing these crystals by slow baking or by drying.

WARNING: Do not eat mushrooms in a survival situation! The only way to tell if a mushroom is edible is by positive identification. There is no room for experimentation. Symptoms of the most dangerous mushrooms affecting the central nervous system may show up after several days have passed when it is too late to reverse their effects.
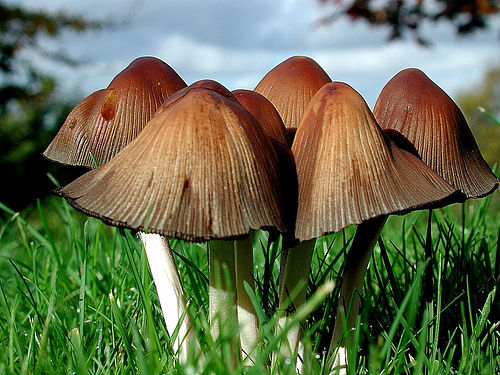
stay away from mushrooms in the wild

How to Test Plants for Edibility

There are many plants throughout the world. Tasting or swallowing even a small portion of some can cause severe discomfort, extreme internal disorders and even death. Therefore, if you have the slightest doubt about a plant’s edibility, apply the Universal Edibility Test before eating any portion of it.

Before testing a plant for edibility, make sure there are enough plants to make the testing worth your time and effort. Each part of a plant (roots, leaves, flowers and so on) requires more than 24 hours to test. Do not waste time testing a plant that is not relatively abundant in the area.

Remember, eating large portions of plant food on an empty stomach may cause diarrhea, nausea or cramps. Two good examples of this are such familiar foods as green apples and wild onions. Even after testing plant food and finding it safe, eat it in moderation. You can see from the steps and time involved in testing for edibility just how important it is to be able to identify edible plants.

To avoid potentially poisonous plants, stay away from any wild or unknown plants that have —

• Milky or discolored sap.
• Beans, bulbs or seeds inside pods.
• Bitter or soapy taste.
• Spines, fine hairs or thorns.
• Dill, carrot, parsnip or parsley-like foliage.
• “Almond” scent in woody parts and leaves.
• Grain heads with pink, purplish or black spurs.
• Three-leafed growth pattern.

Using the above criteria as eliminators when choosing plants for the Universal Edibility Test will cause you to avoid some edible plants. More important, these criteria will often help you avoid plants that are potentially toxic to eat or touch.

The Universal Edibility Test:

1 – Test only one part of a potential food plant at a time.

2 – Separate the plant into its basic components — leaves, stems, roots, buds and flowers.

3 – Smell the food for strong or acid odors. Remember, smell alone does not indicate a plant is edible or inedible.

4 – Do not eat for eight hours before starting the test.

5 – During the eight hours you abstain from eating, test for contact poisoning by placing a piece of the plant part you are testing on the inside of your elbow or wrist. Usually 15 minutes is enough time to allow for a reaction.

6 – During the test period, take nothing by mouth except purified water and the plant part you are testing.

7 – Select a small portion of a single part and prepare it the way you plan to eat it.

8 – Before placing the prepared plant part in your mouth, touch a small portion (a pinch) to the outer surface of your lip to test for burning or itching.

9 – If after three minutes there is no reaction on your lip, place the plant part on your tongue, holding it there for 15 minutes.

10 – If there is no reaction, thoroughly chew a pinch and hold it in your mouth for 15 minutes. Do not swallow.

11 – If no burning, itching, numbing, stinging or other irritation occurs during the 15 minutes, swallow the food.

12 – Wait eight hours. If any ill effects occur during this period, induce vomiting and drink a lot of water.

13 – If no ill effects occur, eat 0.25 cup of the same plant part prepared the same way. Wait another eight hours. If no ill effects occur, the plant part as prepared is safe for eating.

CAUTION: Test all parts of the plant for edibility, as some plants have both edible and inedible parts. Do not assume that a part that proved edible when cooked is also edible when raw. Test the part raw to ensure edibility before eating raw. The same part or plant may produce varying reactions in different individuals.

A List of Plants You Can Eat

An entire encyclopedia of edible wild plants could be written, but space limits the number of plants presented here. Learn as much as possible about the plant life of the areas where you train regularly and where you expect to be traveling or working.

EDIBLE AND MEDICINAL PLANTS:

TEMPERATE ZONE FOOD PLANTS

dandelion leaves

• Amaranth (Amaranthus retroflexus and other species)
• Arrowroot (Sagittaria species)
• Asparagus (Asparagus officinalis)
• Beechnut (Fagus species)
• Blackberries (Rubus species)
• Blueberries (Vaccinium species)
• Burdock (Arctium lappa)
• Cattail (Typha species)
• Chestnut (Castanea species)
• Chicory (Cichorium intybus)
• Chufa (Cyperus esculentus)
• Dandelion (Taraxacum officinale)
• Daylily (Hemerocallis fulva)
• Nettle (Urtica species)
• Oaks (Quercus species)
• Persimmon (Diospyros virginiana)
• Plantain (Plantago species)
• Pokeweed (Phytolacca americana)
• Prickly pear cactus (Opuntia species)
• Purslane (Portulaca oleracea)
• Sassafras (Sassafras albi um)
• Sheep sorrel (Rumex acetosella)
• Strawberries (Fragaria species)
• Thistle (Cirsium species)
• Water lily and lotus (Nuphar, Nelumbo and other species)
• Wild onion and garlic (Allium species)
• Wild rose (Rosa species)
• Wood sorrel (Oxalis species)

TROPICAL ZONE FOOD PLANTS
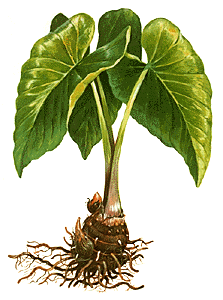
taro plant

• Bamboo (Bambusa and other species)
• Bananas (Musa species)
• Breadfruit (Artocarpus incisa)
• Cashew nut (Anacarium occidental)
• Coconut (Cocos nucifera)
• Mango (Mangifera indica)
• Palms (various species)
• Papaya (Carica species)
• Sugarcane (Saccharum officinarum)
• Taro (Colocasia species)

DESERT ZONE FOOD PLANTS

• Acacia (Acacia farnesiana)
• Agave (Agave species)
• Cactus (various species)
• Date palm (Phoenix actylifera)
• Desert amaranth (Amaranths palmeri)

SEAWEEDS

kelp

One plant you should never overlook is seaweed. It is a form of marine algae found on or near ocean shores. There are also some edible freshwater varieties. Seaweed is a valuable source of iodine, other minerals and vitamin C. Large quantities of seaweed in an unaccustomed stomach can produce a severe laxative effect.

When gathering seaweeds for food, find living plants attached to rocks or floating free. Seaweed washed onshore any length of time may be spoiled or decayed. You can dry freshly harvested seaweeds for later use.

Its preparation for eating depends on the type of seaweed. You can dry thin and tender varieties in the sun or over a fire until crisp. Crush and add these to soups or broths. Boil thick, leathery seaweeds for a short time to soften them. Eat them as a vegetable or with other foods. You can eat some varieties raw after testing for edibility.

• Dulse (Rhodymenia palmata)
• Green seaweed (Ulva lactuca)
• Irish moss (Chondrus crispus)
• Kelp (Alaria esculenta)
• Laver (Porphyra species)
• Mojaban (Sargassum fulvellum)
• Sugar wrack (Laminaria saccharina)

Information courtesy of the U.S. Army Survival Manual.

Thanks again to Kershaw. You can like Kershaw and Zero Tolerance Knives on Facebook.

– Tim